Today we will profoundly examine the applicable information points of “tiles”. This article is supposed to tackle the accompanying issues for you:
- Wet gluing with cement mortar or glue with tile adhesive? Which strategy can make the tiles stick all the more solidly?
- How to utilize the “tile adhesive” for fired tiles?
- What is the tiling system of tile adhesive?
01.Tile adhesive and cement mortar. Which do you like?
The establishment technique for artistic tiles is like that of marble. There are three fundamental sorts: dry hanging, wet sticking, and adhesive gluing. Today we will zero in on the two cycles of wet sticking and adhesive gluing. In this article, we will zero in on the two cycles of wet sticking and adhesive gluing.
In the first place, we should find out about these two materials. I accept numerous companions don’t have a clue about the contrast between them.
Cement mortar: one of our regularly involved materials for adornment and development. It is modest and utilized in spots like structure walls and tiling blocks. However, the clearing thickness is huge, the sticking isn’t firm, the material utilized is excessively, and it is not difficult to empty. These deficiencies make the situation with cement mortar start to decline.
Tile adhesive (tile stick): a recently created helper material for clearing tiles. Its primary attributes are high adhesive strength, water obstruction, maturing opposition, great adaptability, more slender clearing impact, and preferable execution over cement mortar. It saves space and is more advantageous for development. However, the expense is higher contrasted with cement.
In the real development process, which is more grounded, tile adhesive or cement mortar?
- Material examination
Examination of cement mortar and tile adhesive powder:
The shape and shade of cement mortar and tile stick are comparable, and the tile stick is marginally thicker and has no impactful smell.
- Slurry examination
The tile paste and cement mortar are proportioned independently, add water, and mix to shape a slurry. The tile stick is smooth and rich, has a high thickness, and streams gradually; the cement slurry has agglomerates and particles, and rapidly severs.
- Examination of development impacts
Cement mortar in development: For the customary cement mortar tiling, the development steps are confounded, including wetting walls, frothing blocks, supporting, and different advances. The development productivity is moderately low, yet the holding impact additionally isn’t great, and the tile emptying , tumbling off will show up soon.
Tile adhesive in development: You can overlook the means of wet walls, splashing blocks, and so forth. What’s more, since it is loaded with grout, there will be no emptying or tumbling off. Obviously, the stuck tiles are more lovely and more grounded.
- Sticking impact correlation
At the point when open the very much cleared wall tiles, the cement clearing is lopsided, the surface has air openings, it is simple for the tiles to be not immovably stuck, emptying, and tumble off; the tile stick is equally appropriated, the full grout rate is high, and the emptying and tumbling off are difficult to happen…
After such a lot of investigation, you might have been dazed. Which one is more grounded, tile adhesive or cement mortar?
The response is displayed in the image underneath:
As displayed in the image over, the tiles laid with cement mortar seem to chipping and tumbling off, in light of the fact that the tiles are isolated from the water when they experience vibration, and the tiles and cement are exceptionally hard and can’t separate the effect of the effect drill exhaustively.
The tile stick has been bored with 6 successive openings, and the tiles are still entirely steady. This shows that the tile stick has great adaptability, and the tile stick is firmly joined with the ceramic tiles, which really retains the effect force.
- What is the mechanical course of tile clearing?
Subsequent to discussing the materials, we should investigate the cycle stream of utilizing tile adhesive.
- Wall surface treatment
a . The most important phase in any mechanical cycle should be the cleaning of the base layer of the development interface; before the fundamental interaction, the base layer should be tidied up. By and large, the unfilled drum of the tiles tumbles off as a result of the ill-advised handling of the grassroots.
b. Stringently talking, the evenness prerequisite for the base layer of clearing blocks is that the levelness mistake under the 2m ruler will not surpass 3mm, if not it should be evened out with mortar.
c. I accept that many individuals have experienced it in past ventures. The first wall surface is seriously sandy and can be focused on with your hands. As of now, on the off chance that you don’t manage it, regardless of whether the tiles are glued, the tiles will definitely tumble off. This is the spot that companions need to focus on.
- Brush interface specialist
a. Utilize a roller to uniformly paint the wall surface to build the surface harshness and strength of the base layer, in order to work on the adhesive strength between the earthenware tile and the base layer.
b. The capability of the connection point specialist is to surface the concrete network, to all the more likely increment the attachment between the cover layer and the base layer.
- Set up tiles
After the grassroots treatment is finished, we can set up the tiles as per the drawings, and track down the principles for the flexible lines on the wall. This step is vital. Companions need to comprehend that this is to put non-entire blocks in unobvious corners.
Note: The non-entire blocks organized on a level plane and in an upward direction on a similar wall will not surpass two columns. On the off chance that you know these, you will have something to see when you go to the building site.
- Stick Blending
The tile stick we pick will be different for various tiles. While blending the tile stick, it is important to rigorously follow the extent of water included the guidelines, and utilize an electric blender to uniformly blend. Note: It is completely illegal to add cement, sand, and different materials during the blending system.
By and large, the blended paste ought to be left for 10-15 minutes. The elastic powder is completely developed and mixed again for 3-5 minutes before it is prepared for use. The blended paste should be spent in 2 hours or less. It is completely taboo to keep utilizing the dried paste subsequent to adding water.
- Track down the base point
Prior to adhering to the tiles, utilize a level ruler to gauge the base level point, and utilize the cartridge line to jump out the base level line. This step is added to guarantee the verticality and horizontality of the tiles.
- Tiling
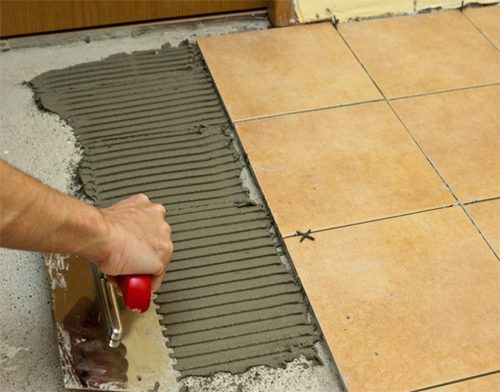
While tiling, you want to follow the wall control line, first glue the two finishes, and glue from the base layer. Utilize the straight edge of a toothed spatula to apply a fitting measure of paste on the outer layer of the base layer to make a base, and afterward utilize the opposite side of the toothed spatula to scratch into stripes.
Properly apply stick on the tiles, lay the tiles level on the scratched stripe base layer, adjust the joints of the tiles, press, and afterward utilize an elastic sledge to immovably pound them.
- Leave holes
Holes should be left when tiles are laid to keep the tiles from growing and contracting because of intensity, protruding, tumbling off, etc. Simultaneously, blunders in tile size and development process are stayed away from. Likewise, the tiles with holes look more lovely.
- Clean the surface of the tile
After the tiles are stuck, to stay away from contamination to the tiles during the clearing system, which influences the appearance. The outer layer of the tiles ought to be tidied up in time, particularly in the event that there is remaining paste.
- Caulking
After the tiles are glued for 24 hours, the caulking system can be completed. The decision of a caulking specialist can not entirely settled by our block climate.
- Cleaning and support
Subsequent to caulking is finished for 10-20 minutes, after the caulking specialist dries, clean the outer layer of the tile with a wrung-out towel or wipe to ensure that there is no buildup of caulking specialist on the outer layer of the tile. Following 24 hours, utilize a dry material to clean the outer layer of the tiles once more.
Such a total arrangement of tile adhesive tiling process is finished.